Showing posts with label crafting. Show all posts

Crafting for Baby


In my last post about our renovation to create a room for baby I mentioned that the kids and I have been doing some crafting. We've got a few projects that we are hoping to finish before he arrives, so far we've finished these sweet paper mache hot air balloons that are floating away in the corner of baby's room.

The kids created the paper mache balloons at one of the great art camps that they attended this summer. Using a real inflated balloon as the model, they placed the wet paper mache on top. Once that was dry they popped the real balloon underneath leaving the hallow paper mache balloon form.

We were trying to figure out where to put them, and then we had the great idea of turning them into decorations for the baby's room. They had never been painted, so the kids and I brainstormed and decided to make one rainbow, and the other rainbow polka dot....those were their choices but these kids know me so well!


We started off painting one balloon turquoise and letting that layer dry. Then adding little baskets underneath so that little felted animals from our nature table could be floating away underneath the balloons.


The kid's attention spans were not long enough for the whole project, so while I worked I set up a painting area for them where they spent the afternoon. We played music and just got totally into our projects, its an afternoon that was full of those moments where I felt so full and happy as we all worked together!


Finally, after letting everything dry over night, the balloons were ready to be hung up with fishing line.

In one basket a little wool hedgehog peeks out,


 In the other basket, two felted blue birds (that we made last year) are snuggling.


The kids love having something that they made in a special place in the baby's room, and they keep talking about how they'll tell the baby about them, while also making up stories about where those little animals are headed on their journey. Just precious!
 

Tooth Fairy Pillow


During my quiet of January I did managed to make some things. One of the cutest was this tooth fairy pillow, I modeled it on the owl pillow that I made for Jasper a couple of years ago when he lost his first tooth. This one was for our niece, she's almost six and absolutely obsessed with loosing her first tooth so I knew this pillow would be a dream come true for her.


There is a small pocket in the front of the owl's belly to hold the precious tooth until the "tooth fairy" comes in the middle of the night to take the tooth and replace it with money or a treat. I'm curious, is this just an American tradition or is it something that people in other parts of the world are familiar with too?

My niece's favorite color is purple so I tried to use variations on that theme, with some complementary colors thrown in. Now I'm working on one in a pink color scheme for Carys!


Here's another sweet visitor who's often in my studio...


We're headed up into the mountains to my family's farm in Asheville for the long Easter weekend, wishing you an exciting holiday celebration!

Tutorial: Wrist Ribbons


These wrist ribbons are one of the fun things that I have made for some of the kids in the Stocking Stuffer Swap, and they are so easy and fun that I wanted to share a tutorial with you so that you can make your own. Maybe even to stuff in a little one's Christmas stocking?
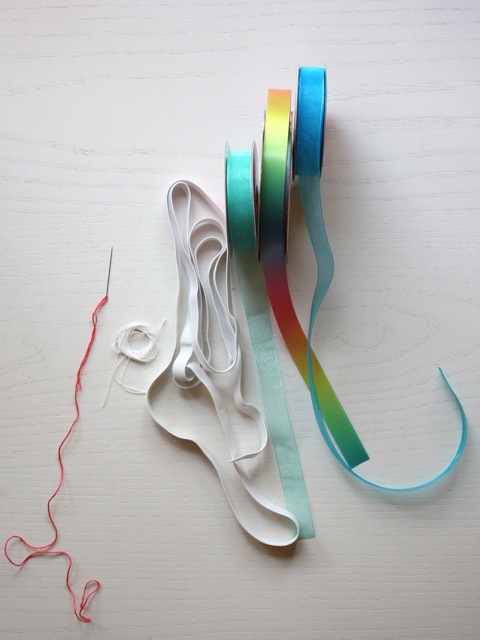
The supplies that I used are three different colors of ribbon all the same width, thin elastic (about 3/4 inch wide), needle and thread, and also a hot glue gun.

I measured my children's wrist and then cut a 6 inch strip of the elastic. I make this into a circle with about an inch of overlap,


I like to begin by putting a line of hot glue on that inch of over lap,


and then press together until set.


Here are my freshly glued elastic wrist circles,


Then I take my three different colors of ribbon, cut into about 1 yard long sections, and stack them lining the cut ends up. I've got my needle and thread ready to sew. If you don't have a glue gun you can begin at this point and just secure everything with your needle and thread.


I place the stacked ribbons against the part of the elastic that I just glued,


and sew, crisscrossing the thread on the side that will be visible when worn,


so that when I am done sewing the stiches look like a little star.


Now they are done and the fun begins, they get put on the wrists,


and away we go!


They seem to make dancing, running, spinning and even gazing just more fun!


Tree Skirt


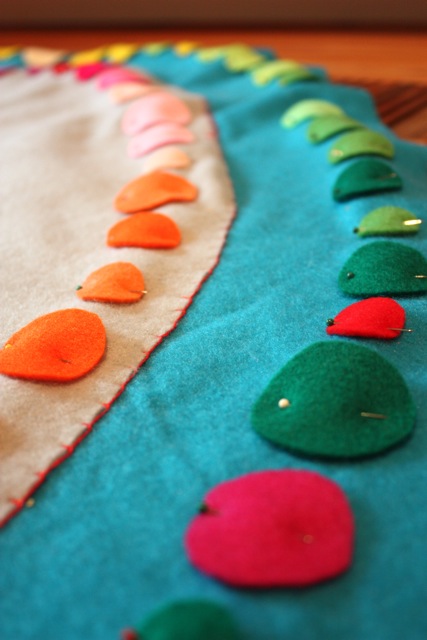
 Making a tree skirt for the base of our Christmas tree is a project that I've had in mind for a few years and finally this year, after being inspired by this tree skirt, I thought it would be fun to make something similar. So, I pulled out the felt and got to work. The rainbow theme is just one that interests me and the project came together as I laid out the dots.


The most time consuming part so far was pinning everything in place. Now, I'm starting to sew the pieces on, I'm wishing that I had a sewing machine for this one, I'm sewing them all on by hand in the evenings while Frank and I watch past seasons of Survivor (our guilty pleasure). I'll post pictures when its done!


Also, I just wanted to mention that tomorrow will be the last day to order from my shop before the holidays, in case you had your eye on something. I'll be closing my shop for a two week holiday break as we leave for our trip to celebrate up north.

Stocking Stuffer Swap


So, I keep mentioning this Christmas crafting swap that I'm taking part in and I wanted to share a bit more about it, since we are really enjoying the anticipation and the crafting! There are 6 families taking part, and 14 children between all of us. The way it works is that all of the mamas make a gift for each child, then send the gifts by Christmas. My kids will get lovely hand made gifts from a bunch of other crafty mamas. Since about half of the families that are participating live in New Zealand I had to finish and send all of their gifts last week, here are some of the things that I made...

The top picture is of a little felt pouch for a 4 year old girl, inside the pouch I tucked some rainbow colored arm ribbons which I have yet to get a picture of, basically they are an elastic bracelet onto which I sewed multi-colored ribbons that stream behind when the child moves, my kids love them!


For a few of the children, as an add on gift I made this little needle felted bee, inspired by a gift that the teachers in our Waldorf Playgroup in Brooklyn gave my children. We've got a while hive of these bees on our family nature table, they are really sweet and so quick to make.


For one set of brothers, ages 4 and 7, I wet felted these two pouches, with swirls on the front. The pouches are almost identical but inside I tucked two different things,


Inside the pouch for the younger brother I tucked a set of arm ribbons, here they are all rolled up...


Inside the pouch for the older brother I tucked a set of these acorn men, Jasper really loves them and they can become anything, fairy guys or army men, you name it.


Here they are all cozy inside,


For a seven year old girl I made a moon fairy,


Who is coming tucked inside a pouch that I wet felted to match the fairy's colors,


Then there are these little needle felted birds that I am just dying over, I love them so much,


These are for a few girls who are 10 and still like cute things a lot. Frank cut a birch log into pieces so that each bird has it's own little perch.


Here are all the packages, I wrapped each gift individually and then put them each in a separate package for each family in NZ, tied up with string. It felt so festive to prepare them and send them off that now I really do feel like Christmas is around the corner! I'll post some pictures and a tutorial of the arm ribbons soon, they are so easy and fun!
You can check out what Morgan, one of the other crafty mamas, is making for the swap on her blog right here,
and here is a post that my friend Em did about some of the gifts that they made last year, such crazy cuteness. 


Creative Commons License
This work is licensed under a Creative Commons Attribution-NonCommercial-NoDerivs 3.0 United States License.